How to change the password for logging into the Tracker Dashboard:
- Log in at https://admin.tracker.com with your valid password
- Select “Change password”
- Enter the current password and then enter the new password twice
- Click on “Change Password”"

How to create a new user for your Tracker device:
- Log in at https://admin.tracker.com using the username and password of the customer administrator user
- Select “Users”
- Select “Create User”
- Select the time zone for the user
- Enter the name and e-mail address
- Select the desired language
- Enter the password for the user
- Click on “Save”
Assign a device to a user:
- Go to the Administration area and on the left side select “Users”
- Go to the user overview, and click the Edit symbol for the desired user
- Click on the “Devices” tab
- For the desired device, click on “Edit”
- Enter any desired name for the device
- Select “Allow view” and/or “Allow view (current position)” and/or “Allow administration”
- Click on “Update”
- Click on “Save”
Update device details:
- Go to the Administration area and on the left side select “Devices”
- Go to the device overview, and click on the Edit symbol for the desired device
- On the "General" tab chose an icon for your device
- On the "Map settings" tab set the desired map settings
- On the "Description" tab enter a name for your device
- Enter any desired name for the device
- Click on “Save”
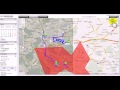
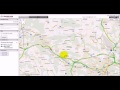
Display traffic information:
- Go to Administration area and on the left side select "Usersettings"
- Activate "Show traffic" and cklick on "Save"
- Click on the tab "Overview"
- Choose the desired area on the map
- red-black: traffic not moving
- ret: very traffic very slow
- yellowb: traffic slow / normal
- green: normal
Program target numbers for your Mobile Locator:
- Go to the Administration area and on the left side select “Devices”
- Select the device overview for the Mobile Locator and click on the Edit symbol
- Click on the “Phone Settings” tab
- Enter the desired target number in the prescribed format Note: If you have not ordered the 7/24 Help Line option, Phone Number 1 is automatically set as the emergency number (SOS button).
- Click on “Save” - the numbers will be active on your Mobile Locator within 5-10 Minutes
Display the logbook:
- On the “Details view” tab, change the image size by dragging the frame
- To follow a route, select the route and click on the Play button in the Navigation area on the left
- The route is now followed and details are displayed on the map view

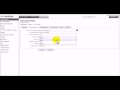
Create a geofence:
- Go to the Administration area and on the left side select “Geofencing”
- Click on “Create Geofencing Rule”
- Give a name to the geofence, and add any text you like in the Description field
- Click on “Next”
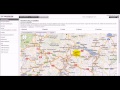
- Go to the map and select the area in which the geofence should be set up (increase the size of the Map view)
- Click on “Add polygon (box)”
- Modify the polygon as desired by clicking on the thumbtacks and dragging the mouse
- Once the polygon has been modified, click on “Next”
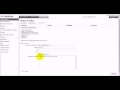
- Select the device for which geofencing should be activated
- Click on “Next”
- Activate one or both actions (entering or exiting the area)
- Activate “Send e-mail” and/or “Send SMS”
- Enter the e-mail address to which a message should be sent if the borders are crossed
- Enter the SMS number to which a message should be sent if the borders are crossed
- Click on “Next”
- Read the special terms and conditions, then confirm you agree by marking the check box
- Click on “Save”"
Create an SOS action (for devices with the SOS button):
- Go to the Administration area and on the left side select “Additional actions”
- Click on “Create additional action”
- Select the “SOS Button” type, then enter a name and any desired text in the Description field
- Click on “Next”
- Select the device for which the SOS action should be activated
- Click on “Next”
- Activate “Send e-mail” and/or “Send SMS”
- Enter the e-mail address to which a message should be sent if the SOS button is pushed
- Enter the SMS number to which a message should be sent if the SOS button is pushed
- Click on “Next”
- Read the special terms and conditions, then confirm you agree by marking the check box
- Click on “Save”
Set up an action for battery level monitoring (for devices with a battery):
- Go to the Administration area and on the left side select “Additional actions”
- Click on “Create additional action”
- Select the “Battery Status” type
- Under “Subtype”, select the battery level that will trigger a message
- Enter a name and add any text you like in the Description field
- Click on “Next”
- Select the device for which the action should be activated
- Click on “Next”
- Activate “Send e-mail” and/or “Send SMS”
- Enter the e-mail address to which a message should be sent when the corresponding battery level has been reached
- Enter the SMS number to which a message should be sent when the corresponding battery level has been reached
- Click on “Next”
- Read the special terms and conditions, then confirm you agree by marking the check box
- Click on “Save”

Request the current position of the Mobile Locator:
- Go to the Overview map tab on the Mobile Locator, go to the left side and then click on “Locate now”
- The location service entails a fee, and the units are charged against your SMS credits
- Read the conditions and accept them by marking the check box
- The request for position is sent out
- Wait roughly 5 minutes, then go to Update on the upper left side and click on the green Update button
- The current position is displayed
Logging of events:
- Go to the Administration area and on the left side select “Usersettings”
- Activate "Show events" and click on "save”
- Create a "Geofence" around the aerea where you want to report arrivals and departures.
- Choose "Geofencing" in the leftside navigation
- Click on "Create Geofencing Rule" and enter a name.
- Click on "Next"
- Choose the area of the geofencing (see also create geofencing)
- After having established the region click on "Next"
- Select the device(s) that should be activated for the Geofencing
- Click on "Next"
- Activate one or both Actions when entering or exiting the aerea.
- Activate "Create event"
- Click on "Next"
- Accept the special terms and conditions
- Click on "Save"
- In the Geofencing-Overview select the Geofencing and click on "Viev"
- Choose the time period and click on Events
- Events are listet and you can export into CSV, Excel, PDF or RTF)
Editing the Details view:
Examine some of the editing possibilities in the Details view
Note:
In the “User settings” area you can activate basic settings such as logbook display, speed display and altitude display